
Add Nodes to Your Canvas in Filmora.TV
Filmora.TV works around a canvas-based workflow, a visual workspace that gives you an open, infinite space (canvas) to arrange text, images, videos, and audio in one place. You can drop assets, move them around, and connect them to build the structure that your project needs.
Everything you add to the canvas is organized through nodes. Each node acts as a building block for a specific type of content. Filmora.TV currently supports text, image, video, audio, and script nodes, which can be added as many as you like.


Practice each step from this guide directly in Filmora.TV.
In this article
Text Node
The Text Node turns a prompt into written content, such as a script outline, ad copy, or brand messaging. Here's how to add a text node in Filmora.TV.
-
Step 1 Add a Text Node
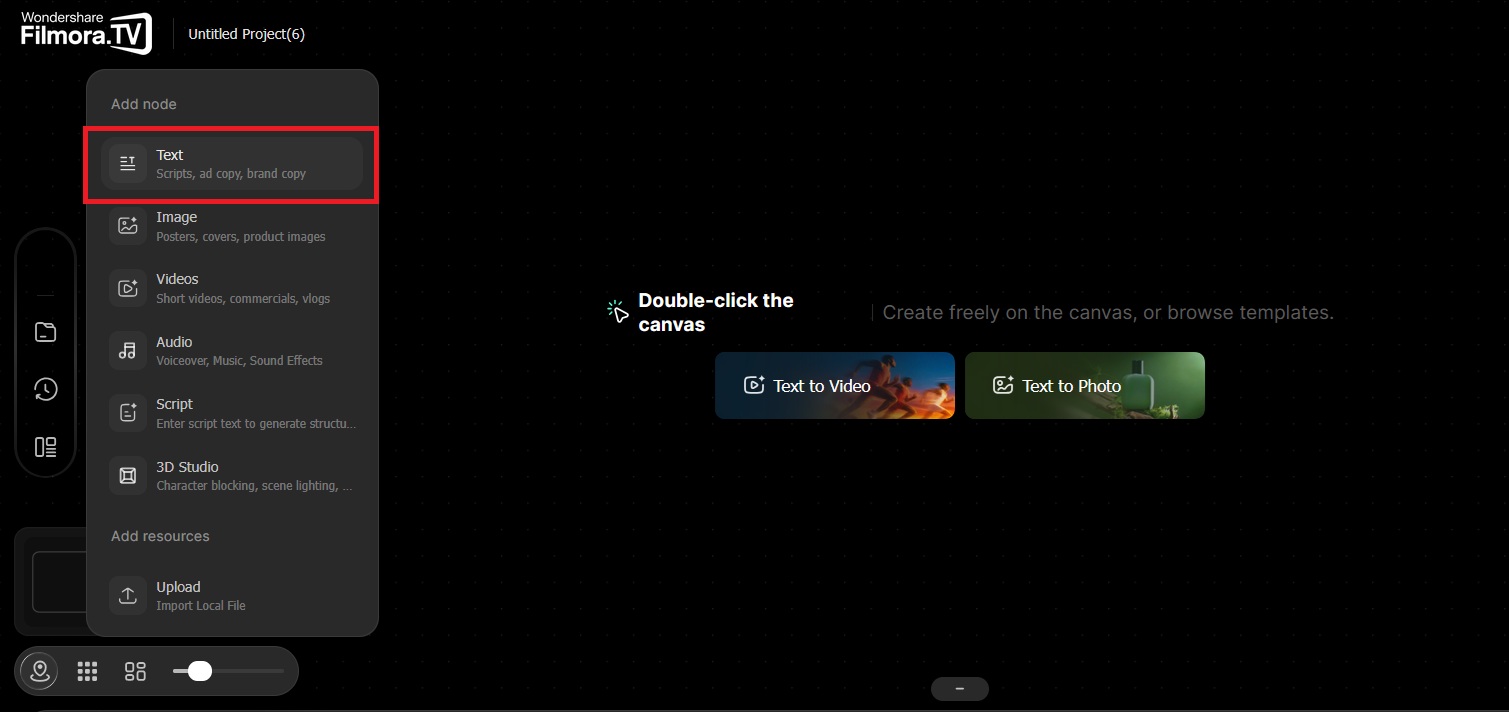
Click the Add (+) button on your canvas and select Text from the menu.
-
Step 2 Select an AI Model
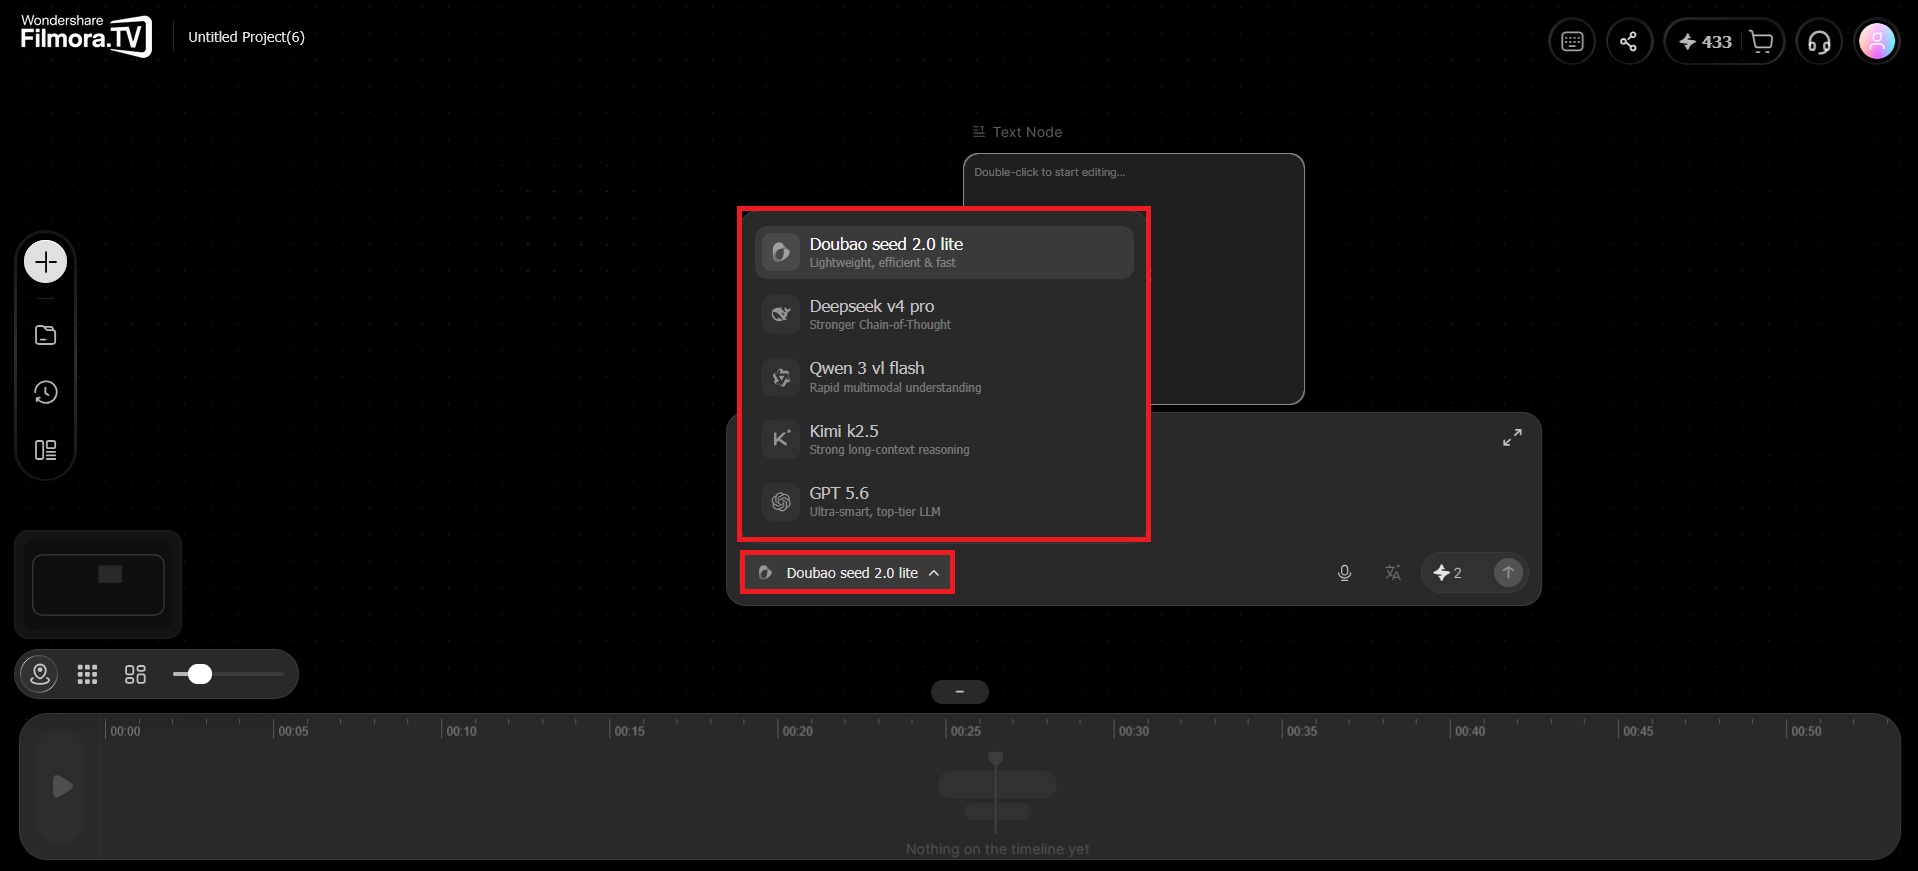
Choose which AI model generates your text. Currently, Filmora.TV supports:
- Doubao Seed 2.0 Lite
- Deepseek V4 Pro
- GPT 5.6
- Qwen 3 VL Flash
- Kimi K2.5
-
Step 3 Enter Prompt and Generate
Type your prompt describing what you want or click the mic icon to speak it instead. Then, hit Generate (↑).
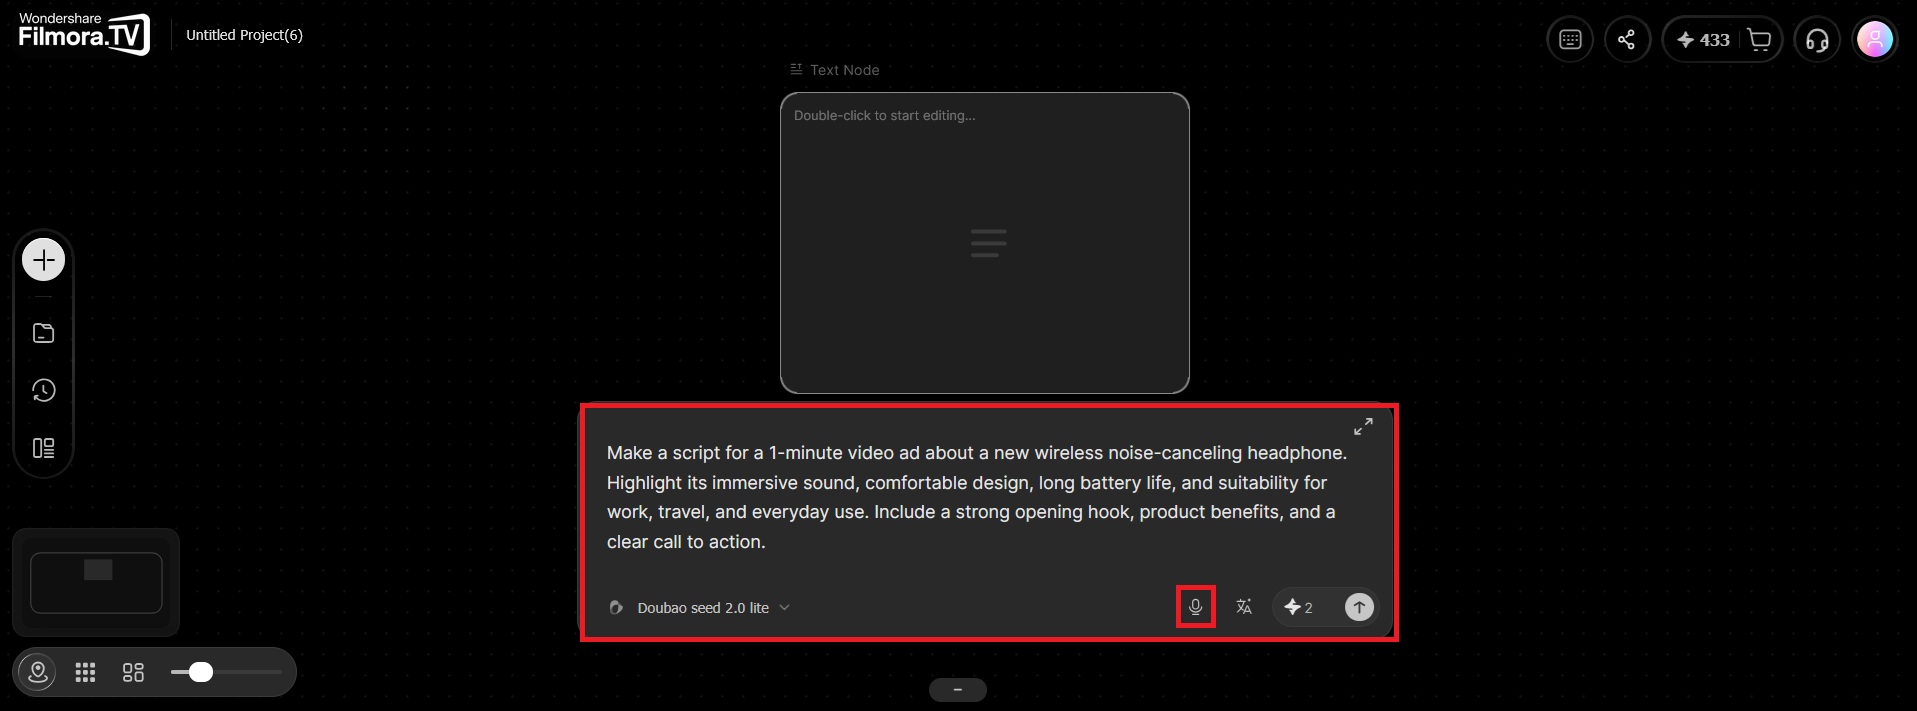
Image Node
The Image Node generates images from a written prompt (posters, product images, covers, etc.). You can also upload a reference or choose an existing image from your asset library to shape the generated image. Here's how to add an image node.
-
Step 1 Add an Image Node
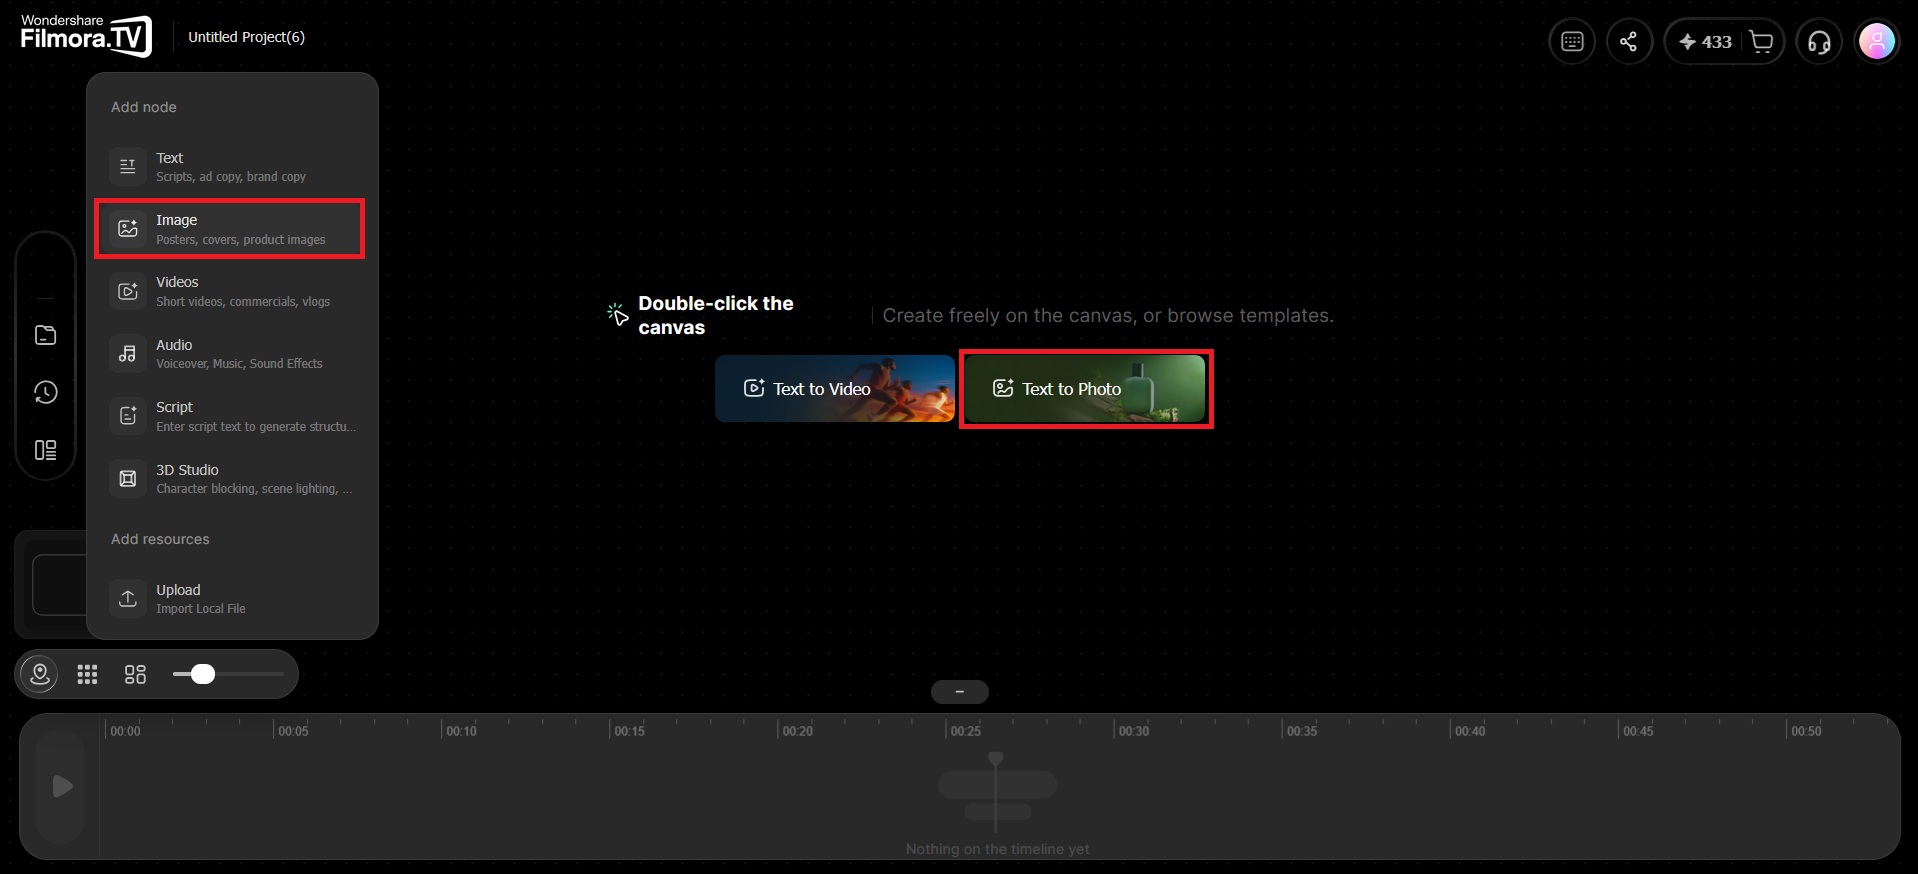
Click the Add (+) button on your canvas and select Image from the menu, or directly click "Text to Photo."
-
Step 2 Select an AI Model and Enter a Prompt
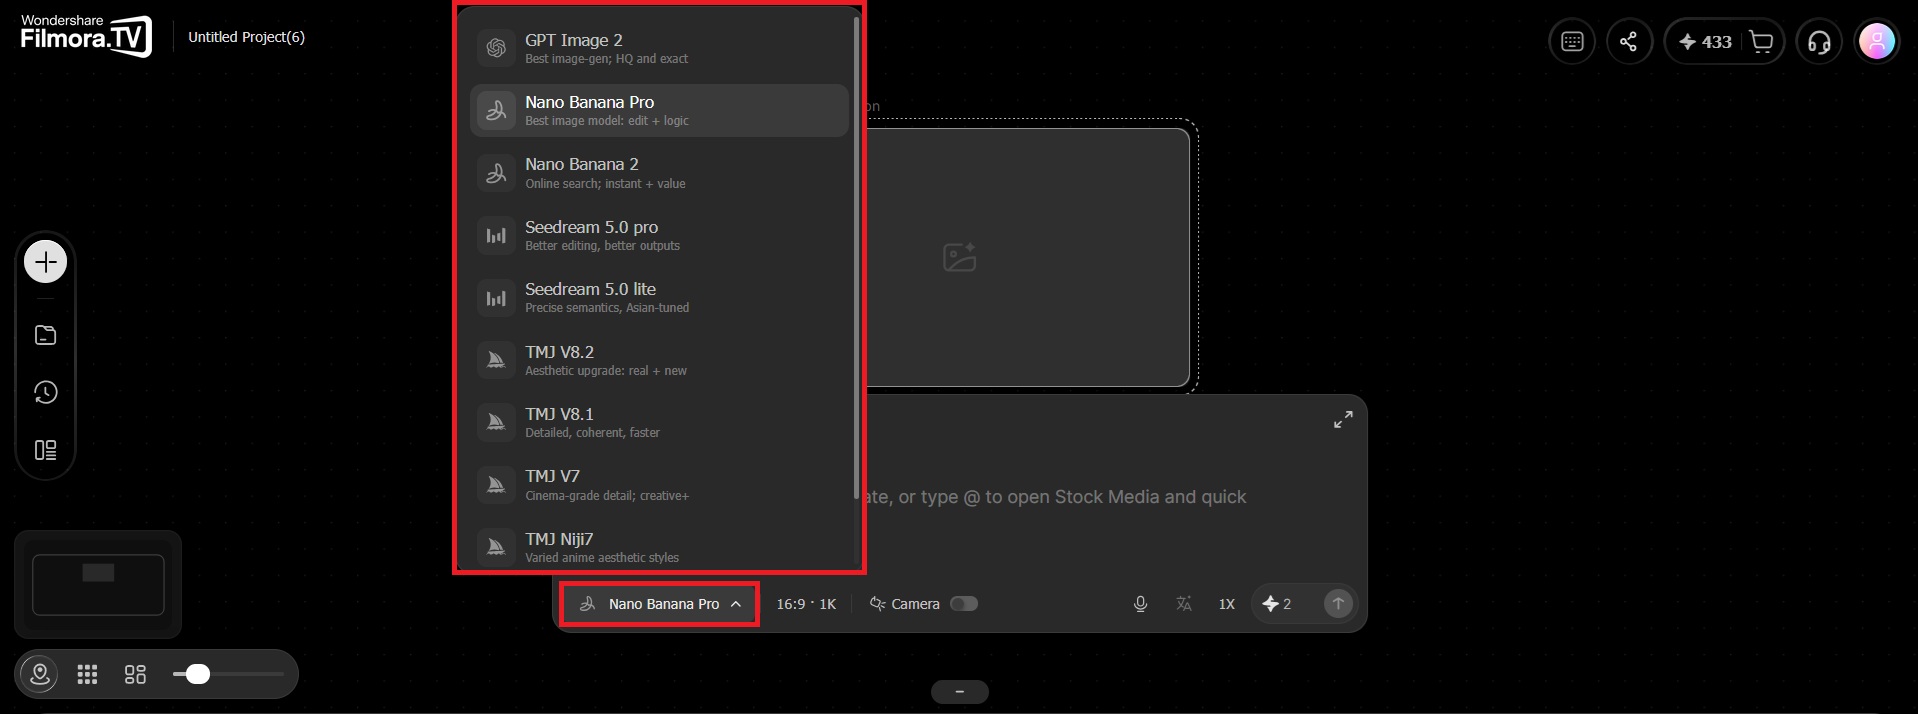
Filmora.TV gives you several image models to pick from, each with its own style, strengths, and credit usage. Available models for image generation include:
- GPT Image: GPT Image 2
- Nano Banana: Nano Banana Pro, Nano Banana 2
- Seedream: Seedream 5.0 Pro, Seedream 5.0 Lite
- TMJ: TMJ V8.2, TMJ V8.1, TMJ V7, TMJ Niji7
- Vidu: Vidu Q2
-
Step 3 Upload Reference Image or Media from Asset Library (Optional)
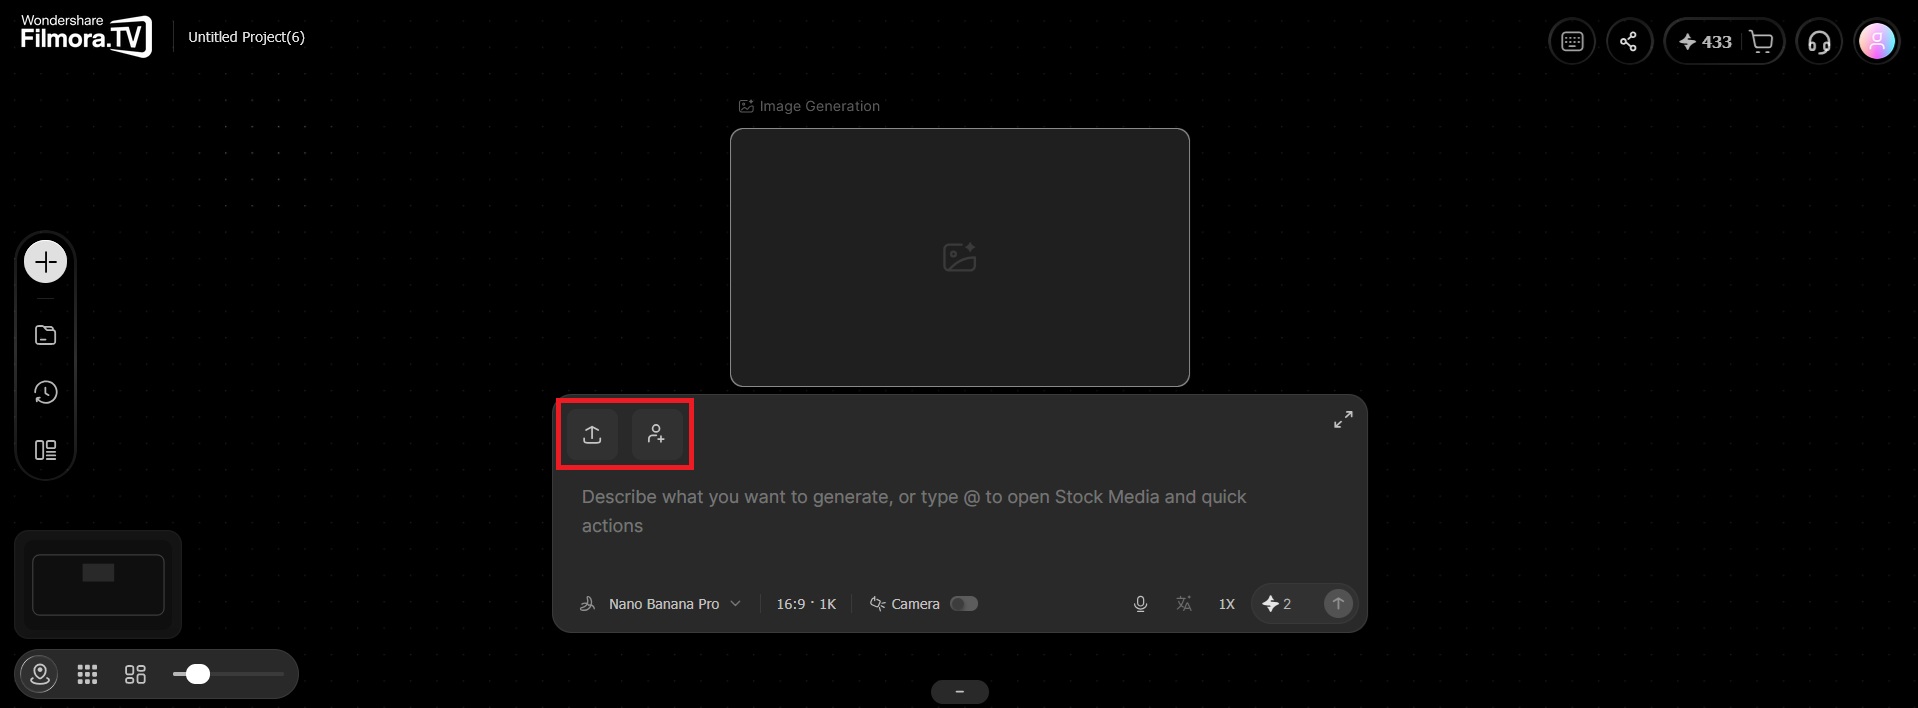
If you want to edit or build off an existing image, select the Upload icon to bring in an image of your own, or the Add Media option to pull something from your asset library.
-
Step 4 Describe and Enter Prompt
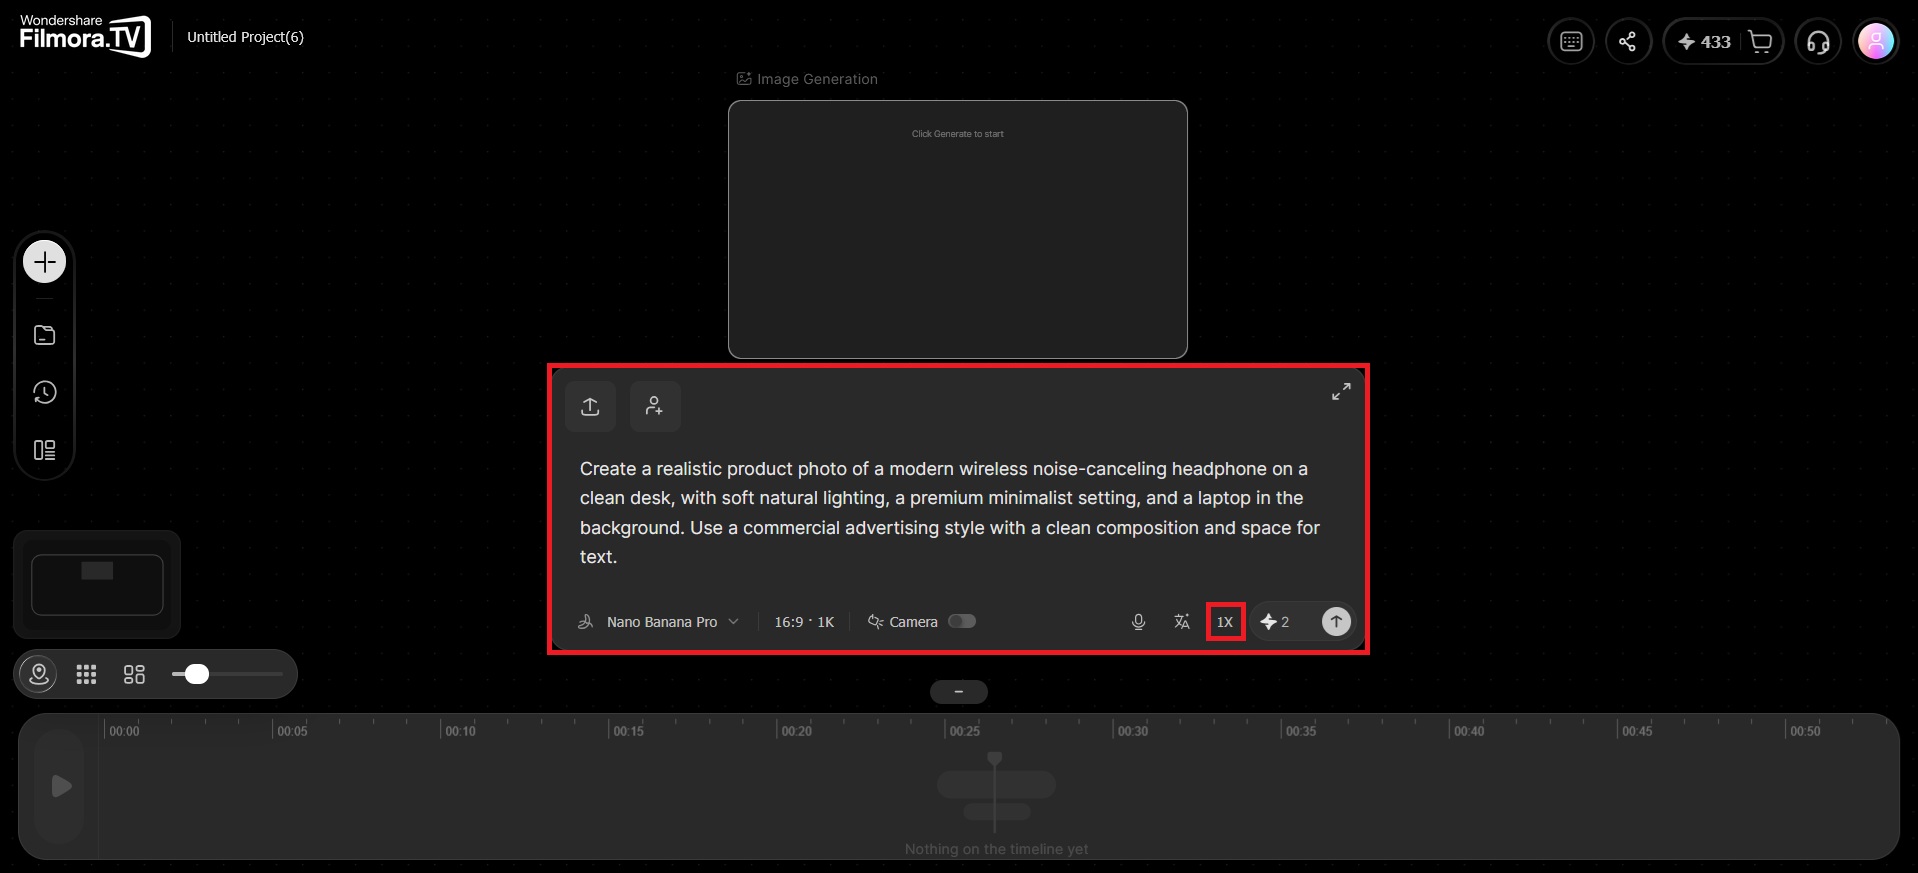
Type what you want the image to show. Before you generate, you can also choose how many images you want to produce in that batch.
-
Step 5 Adjust Image Settings and Camera Control
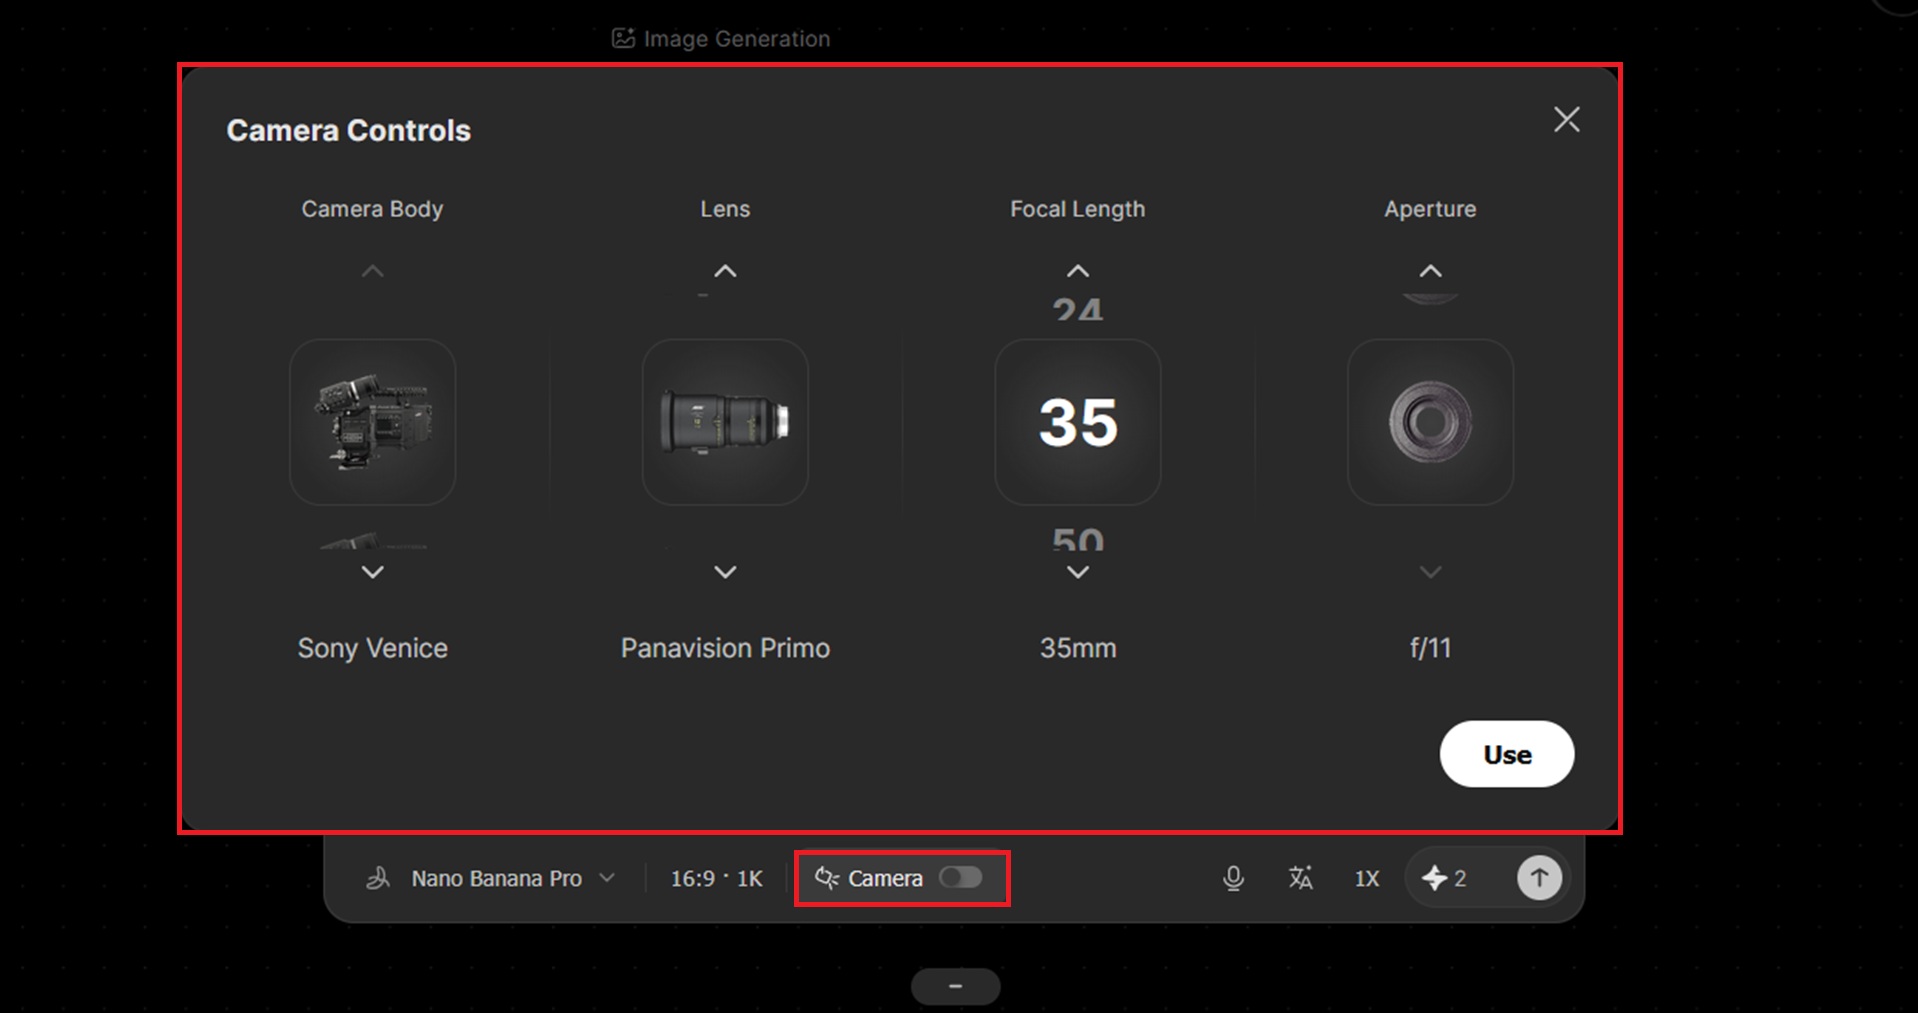
To give your generated image a specific look, use Filmora.TV's Camera Controls to pick from several professional camera settings, including camera type, lens, focal length, and aperture.
Video Node
The Video Node generates video from a text prompt or from photos, for things like short-form videos, commercials, or vlogs. It's backed by several AI models, and each model's specific capabilities, like web search or automatic media checking on Seedance, carry over into the node.
-
Step 1 Add a Video Node
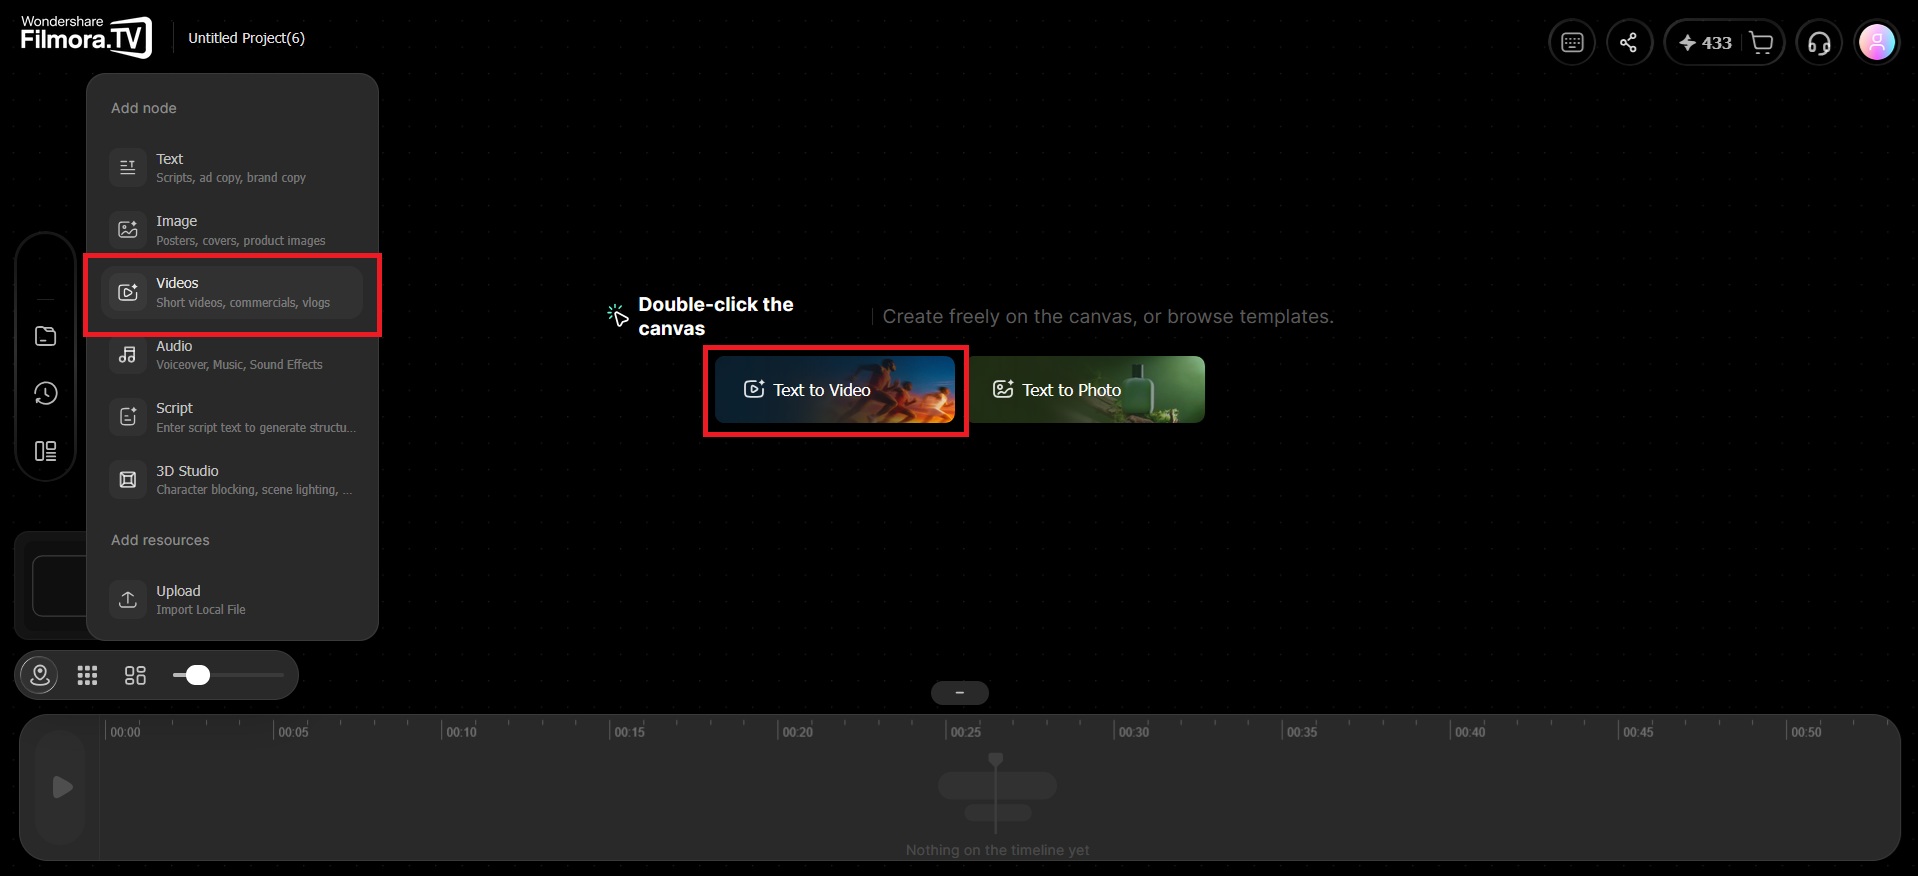
Click the Add (+) button on your canvas and select Video from the menu, or directly click "Text to Video."
-
Step 2 Select an AI Model and Video Generation Method
Filmora.TV supports text-to-video, image-to-video, first-and-last-frame, and all-in-one reference generation. Available models include:
- Seedance: Seedance 2.0, Seedance 2.0 Fast, Seedance 2.0 mini, Seedance 2.5
- HappyHorse: HappyHorse 1.0, HappyHorse 1.1
- MiniMax: MiniMax H3, MiniMax H3 Max, Hailuo 2.3
- Wan: Wan 3.0
- Kling: 3.0, Omni 3.0
- Google: Gemini Omni Flash, Veo 3.1, Veo 3.1-Fast, Veo 3.1-Lite
- Vidu: Vidu Q3, Vidu Q3-Mix, Vidu Q3-Ad

-
Step 3 Upload Reference Image or Media from Asset Library
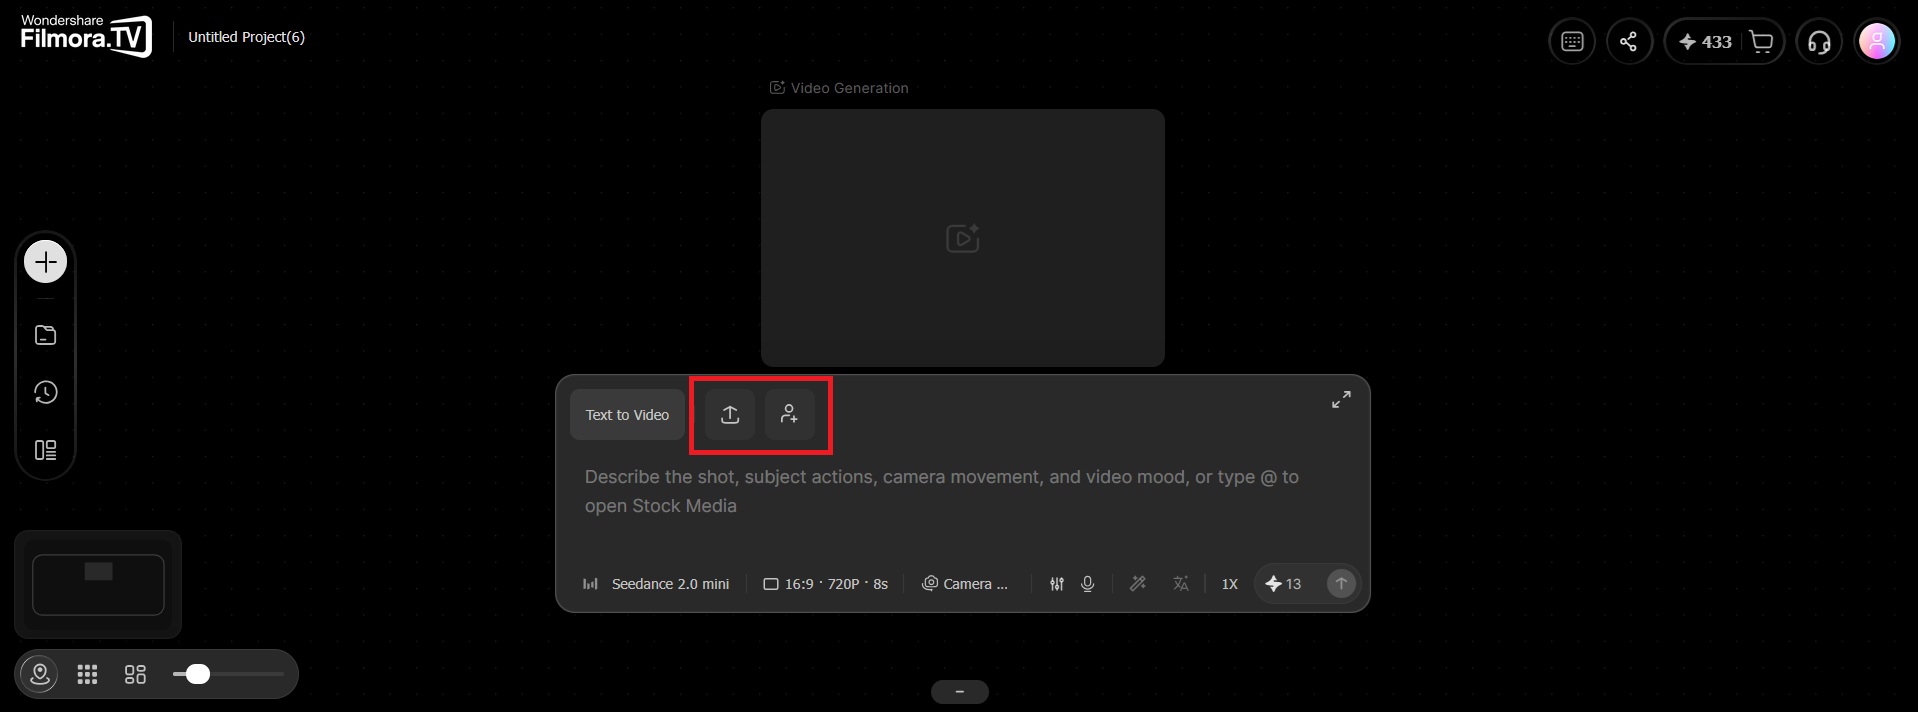
Similar to the Image Node, you can upload your own image (or video), or use the Add Media icon to pull a reference from your asset library.
-
Step 4 Enter the Prompt and Set Camera Control
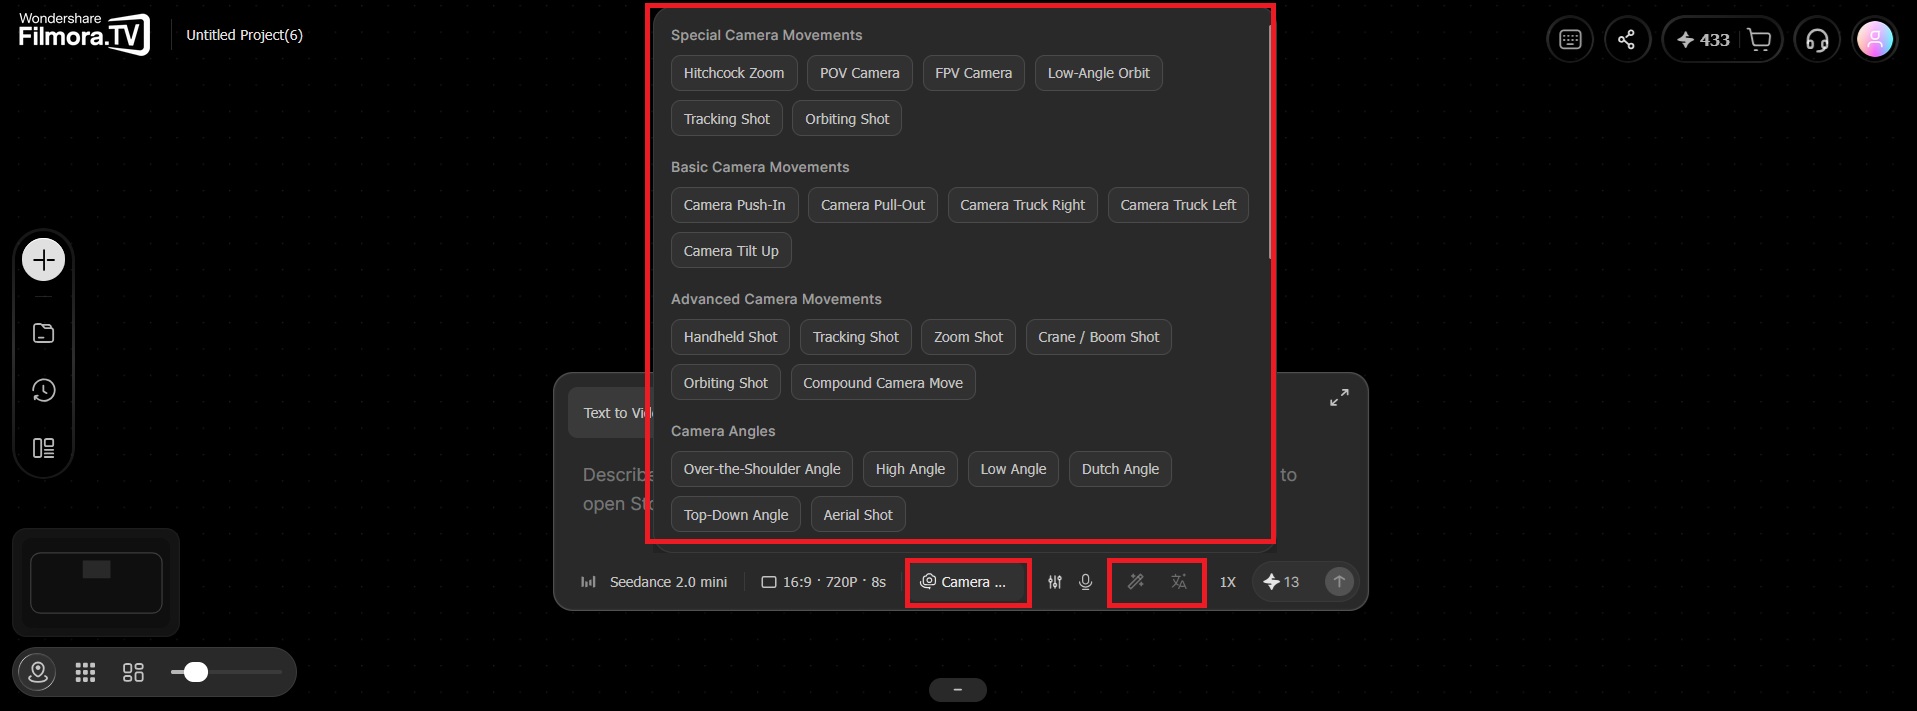
To help direct the shot, Filmora.TV gives you camera control presets you can select and automatically add to your prompt. From there, type your full prompt or use voice input. Filmora.TV also supports Prompt Optimization and Prompt Translation.
-
Step 5. Adjust Video Settings and Start Generating
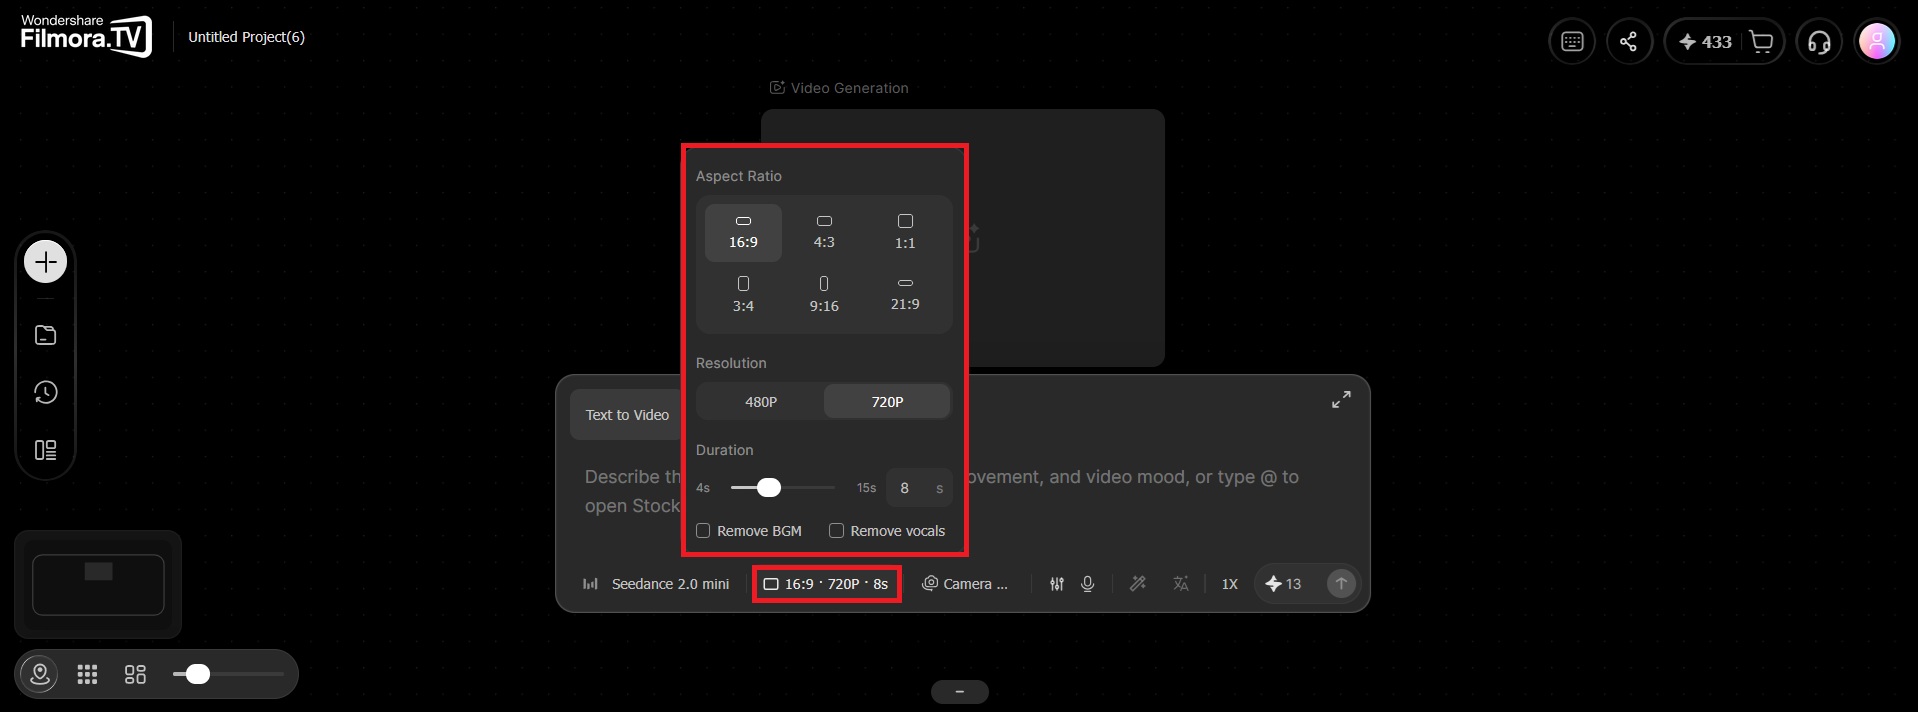
Set your aspect ratio, duration, and video quality before generating. Available resolutions and durations vary depending on the selected model. Once ready, hit generate.
Audio Node
The Audio Node covers voiceover, music, and sound effects directly from text prompts. Here's how to add an audio node.
-
Step 1 Add an Audio Node
Click the Add (+) button on your canvas and select Audio from the menu.

-
Step 2 Select AI Audio Tool
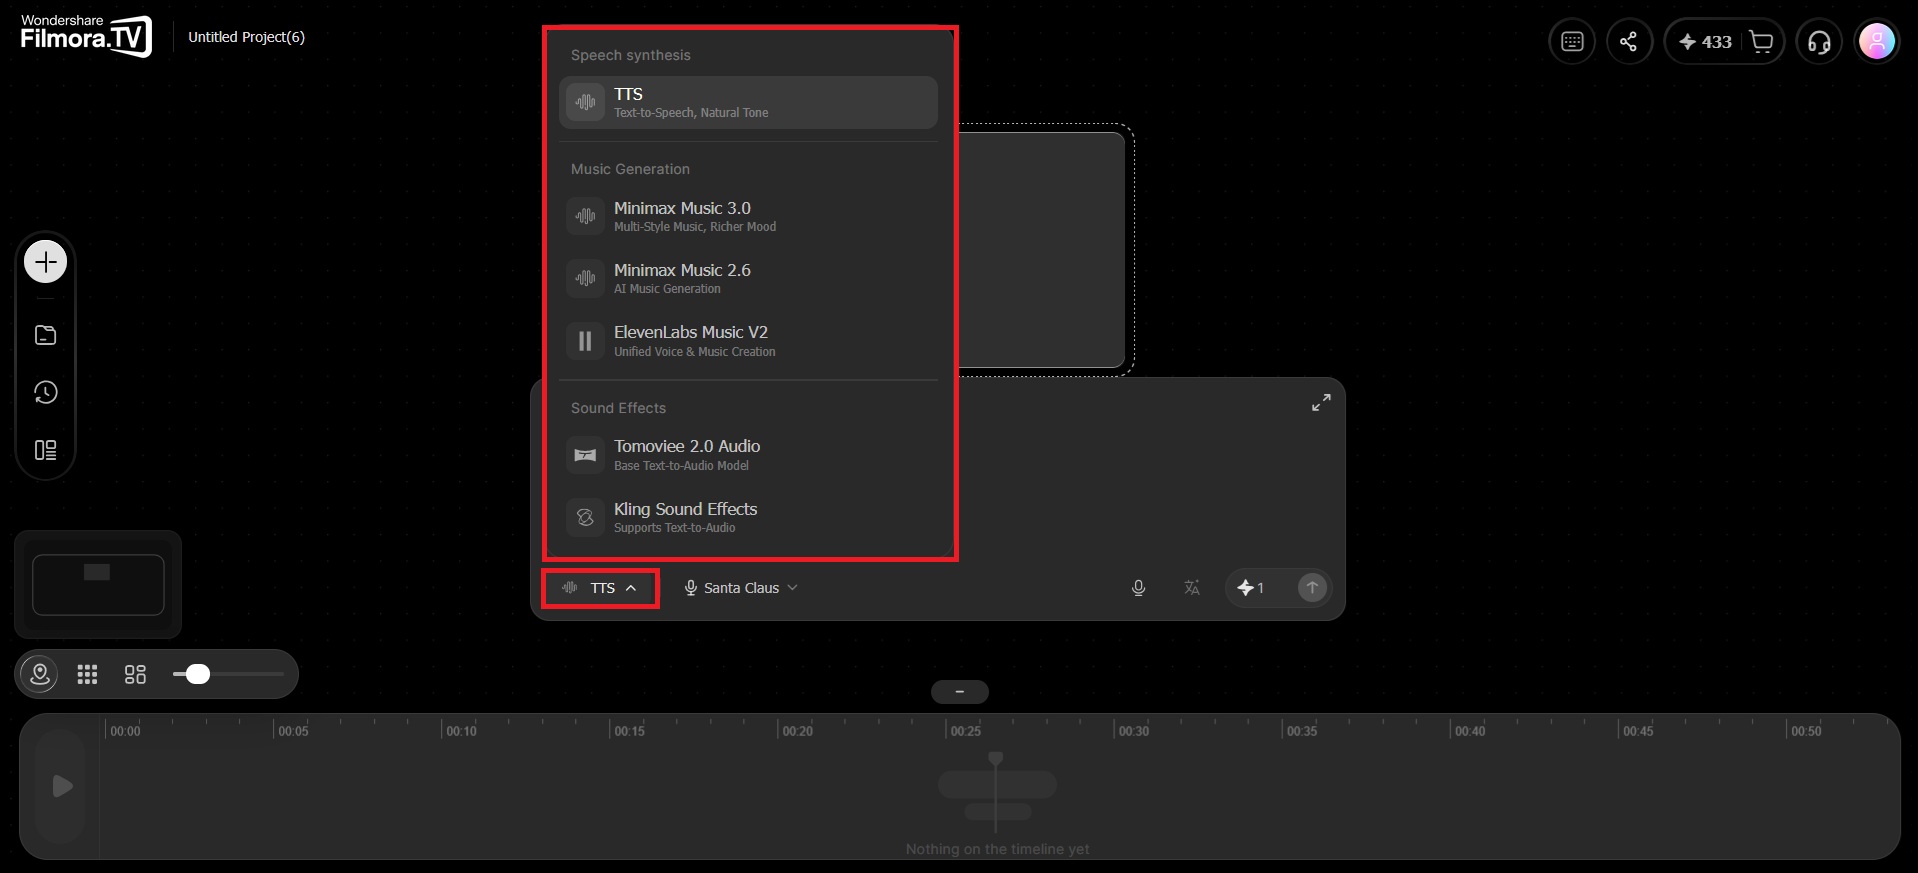
Select what you want to create. Filmora.TV AI Audio node includes Speech Synthesis (TTS), Music Generation, and Sound Effects Generation, each powered by different models:
- Music Generation: Minimax Music 3.0, Minimax Music 2.6, ElevenLabs Music V2
- Sound Effects: Tomoviee 2.0 Audio, Kling Audio
-
Step 3 Enter the Prompt Description and Generate
- For Speech Synthesis, enter the text you want to turn into a voiceover and select a voice.
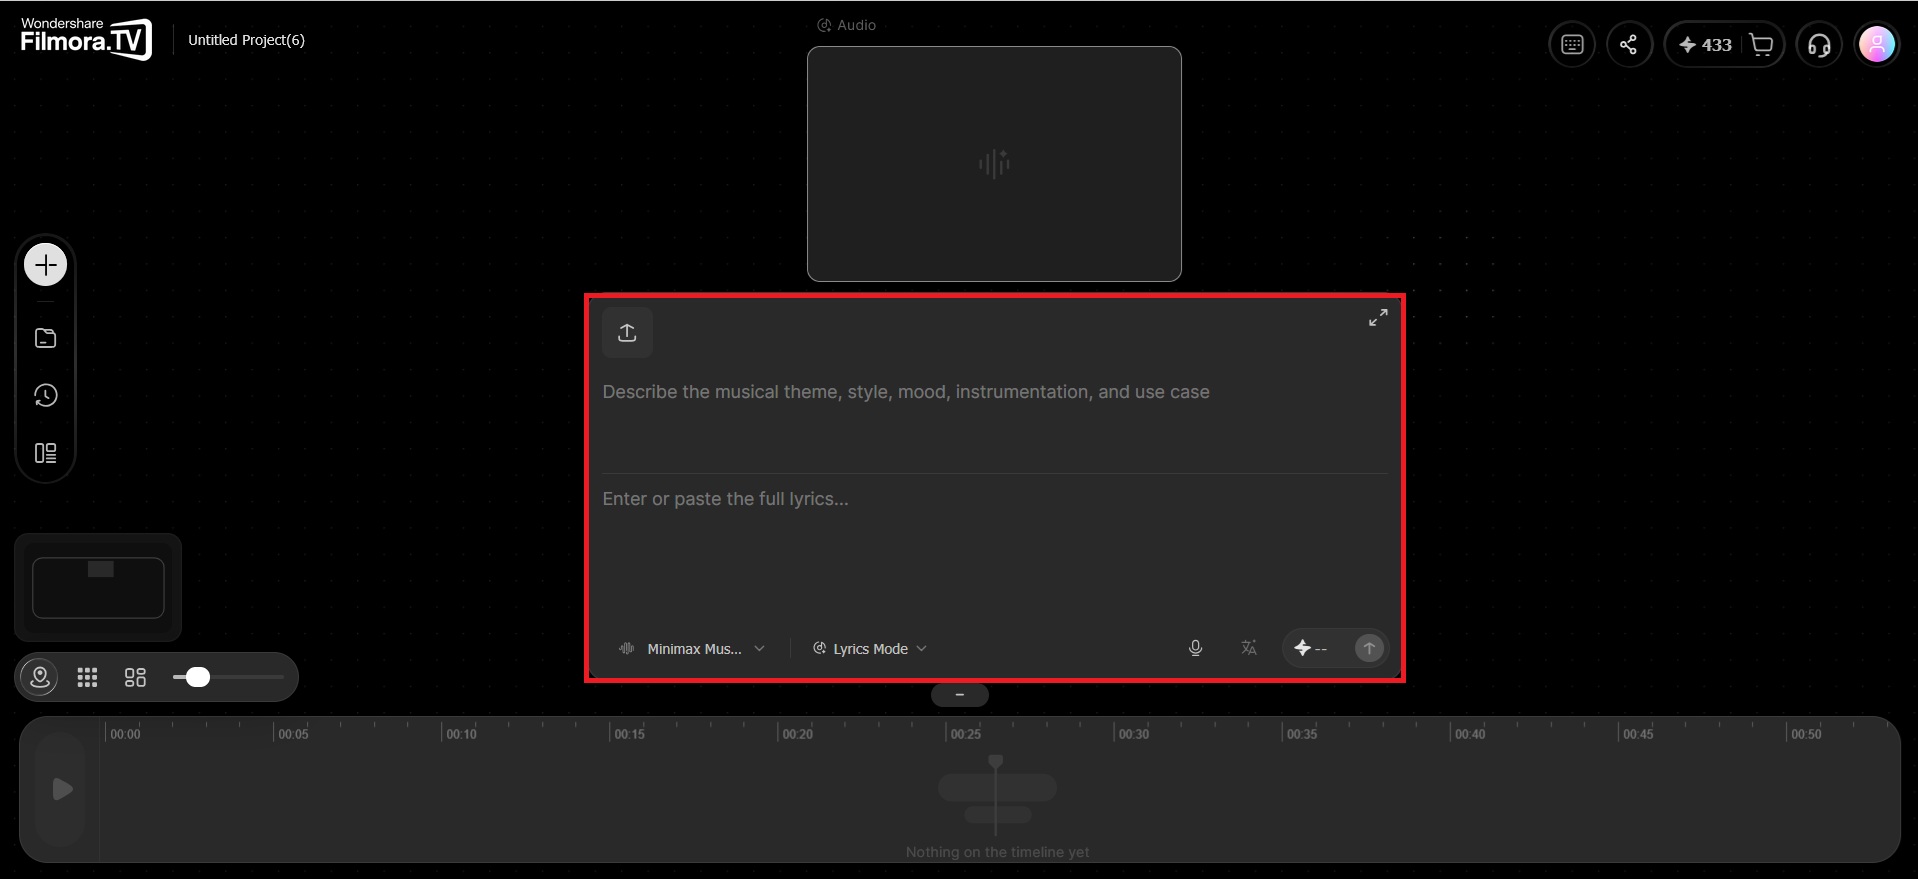
- For Music Generation, you can add lyrics and describe the musical theme, style, mood, instrumentation, and intended use case.
- For Sound Effects Generation, describe the sound you want, such as footsteps, a door opening, or city traffic.
- You can also upload an audio file as a source or reference for your generated audio.
Script Node
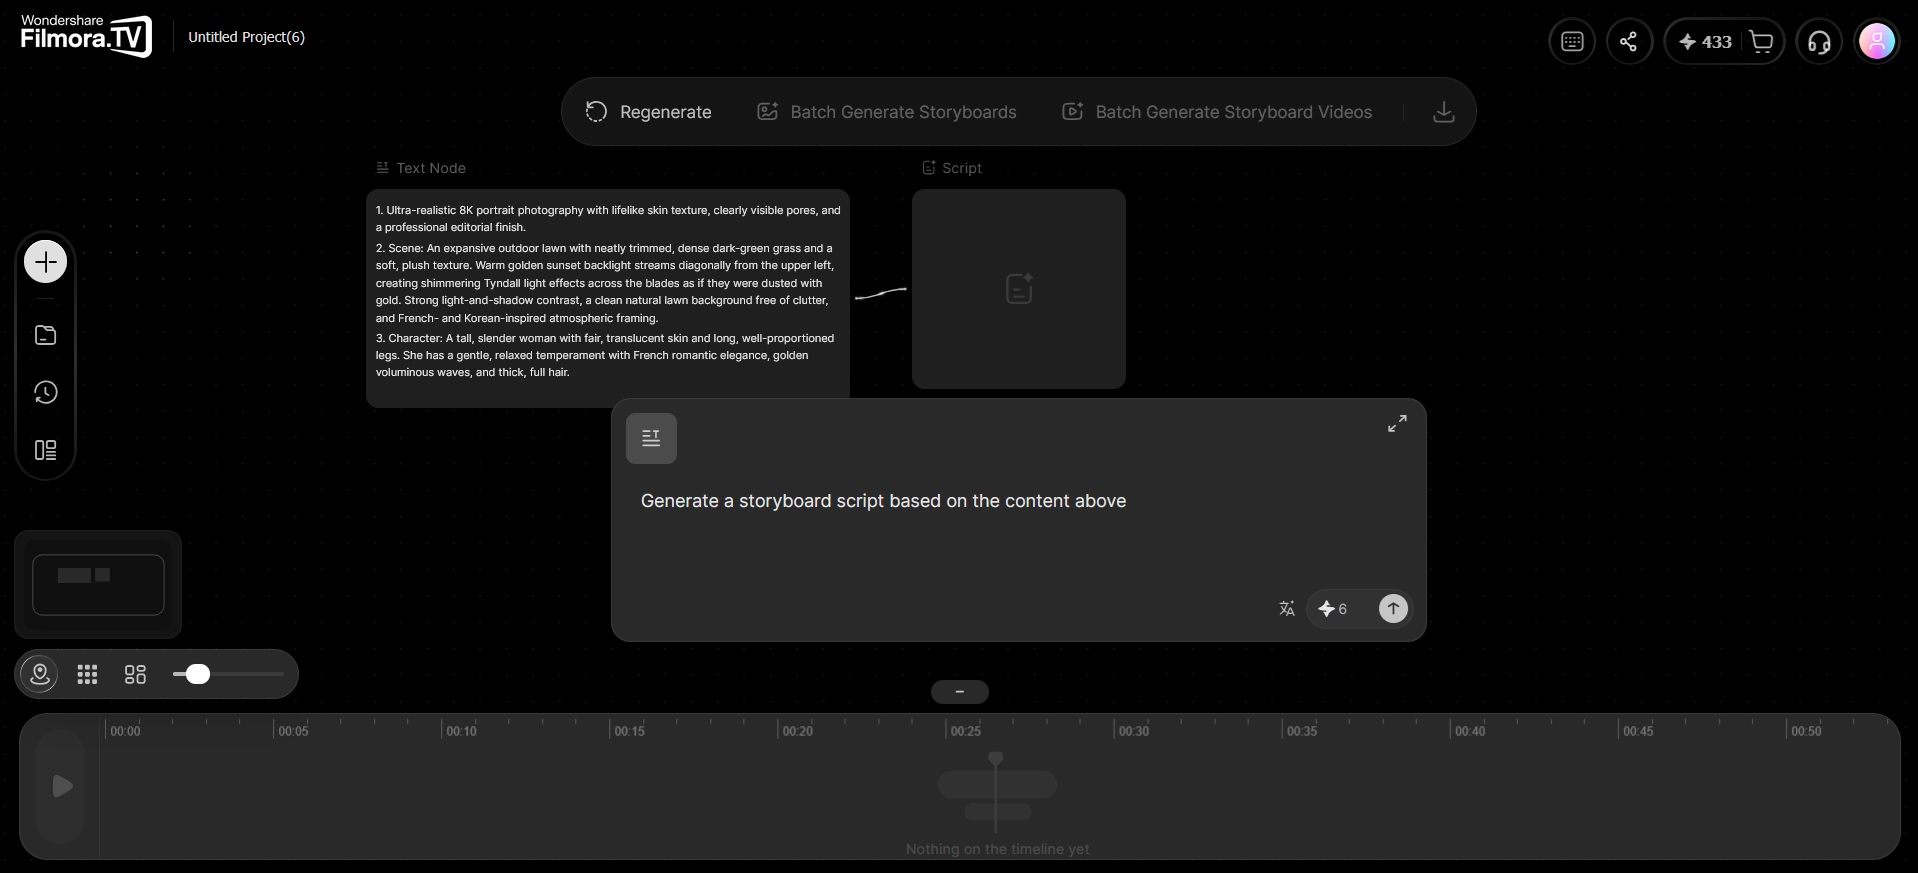
The Script Node specifically generates a full structured script from a text prompt, which is useful for building out a storyboard before creating the visuals.
-
Step 1 Add a Script Node
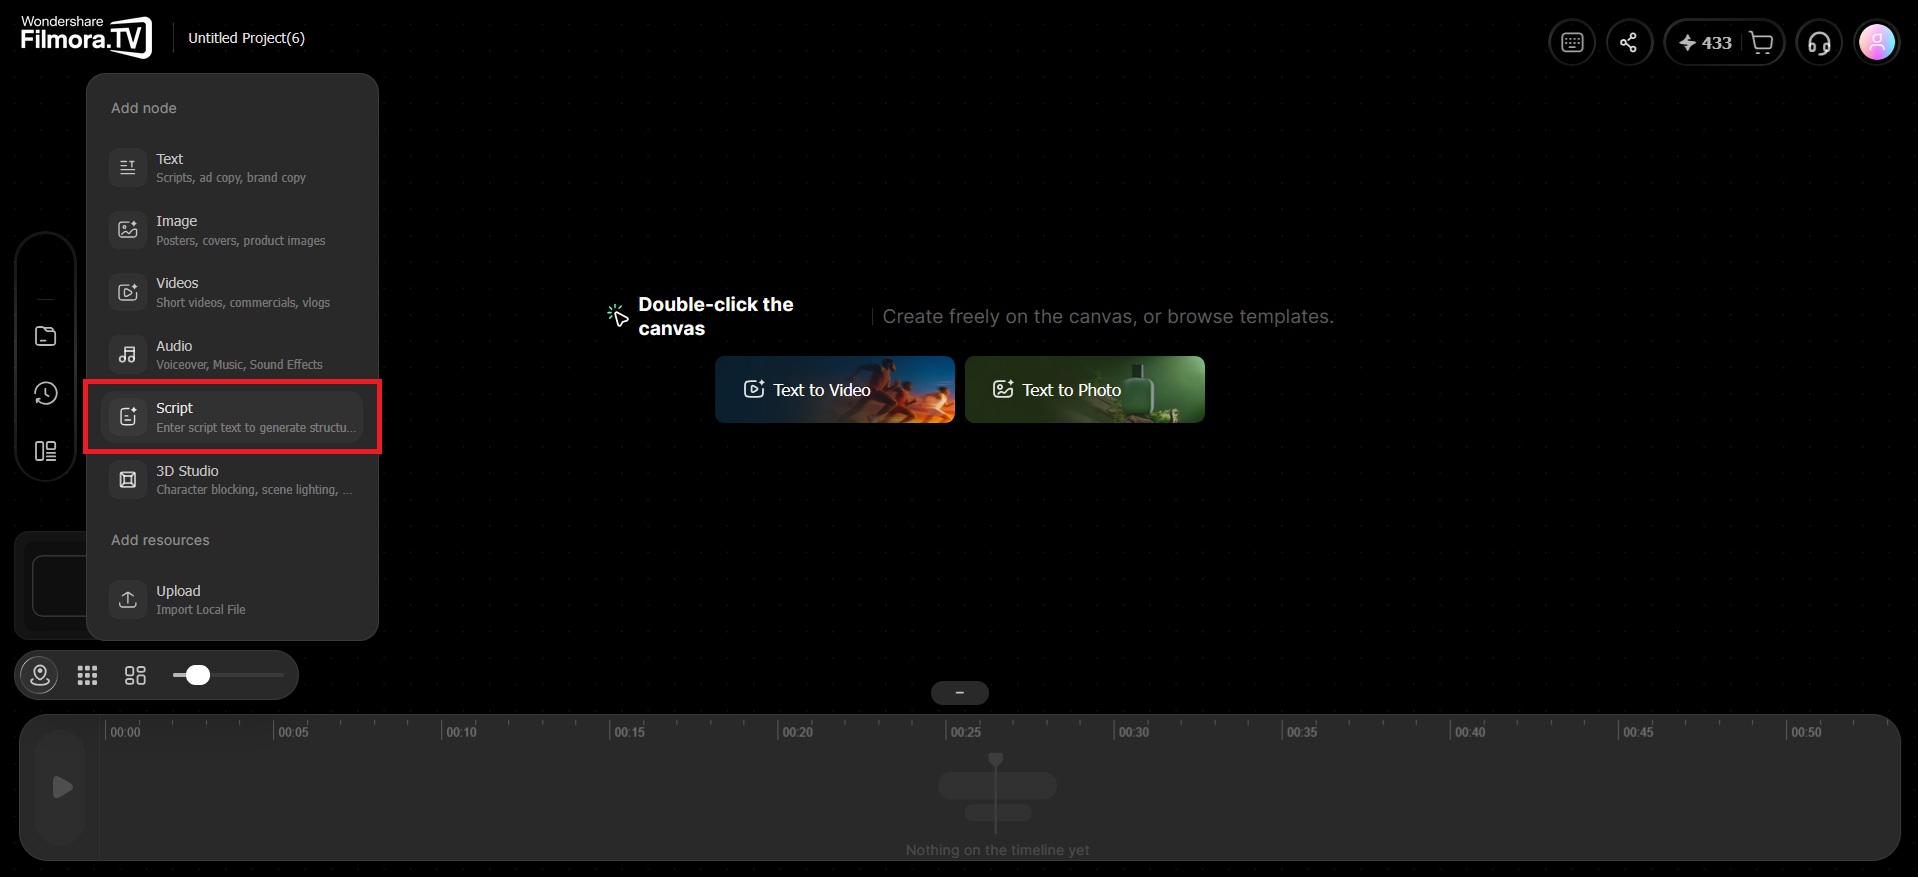
Click the Add (+) button on your canvas and select Script from the menu.
-
Step 2 Describe What You Want to Create
Enter a description of the story, video concept, or script you want to create. Your input will be added to the Text Node that it automatically connects to. Then, use the Script Node to ask the AI to generate a script based on your description.
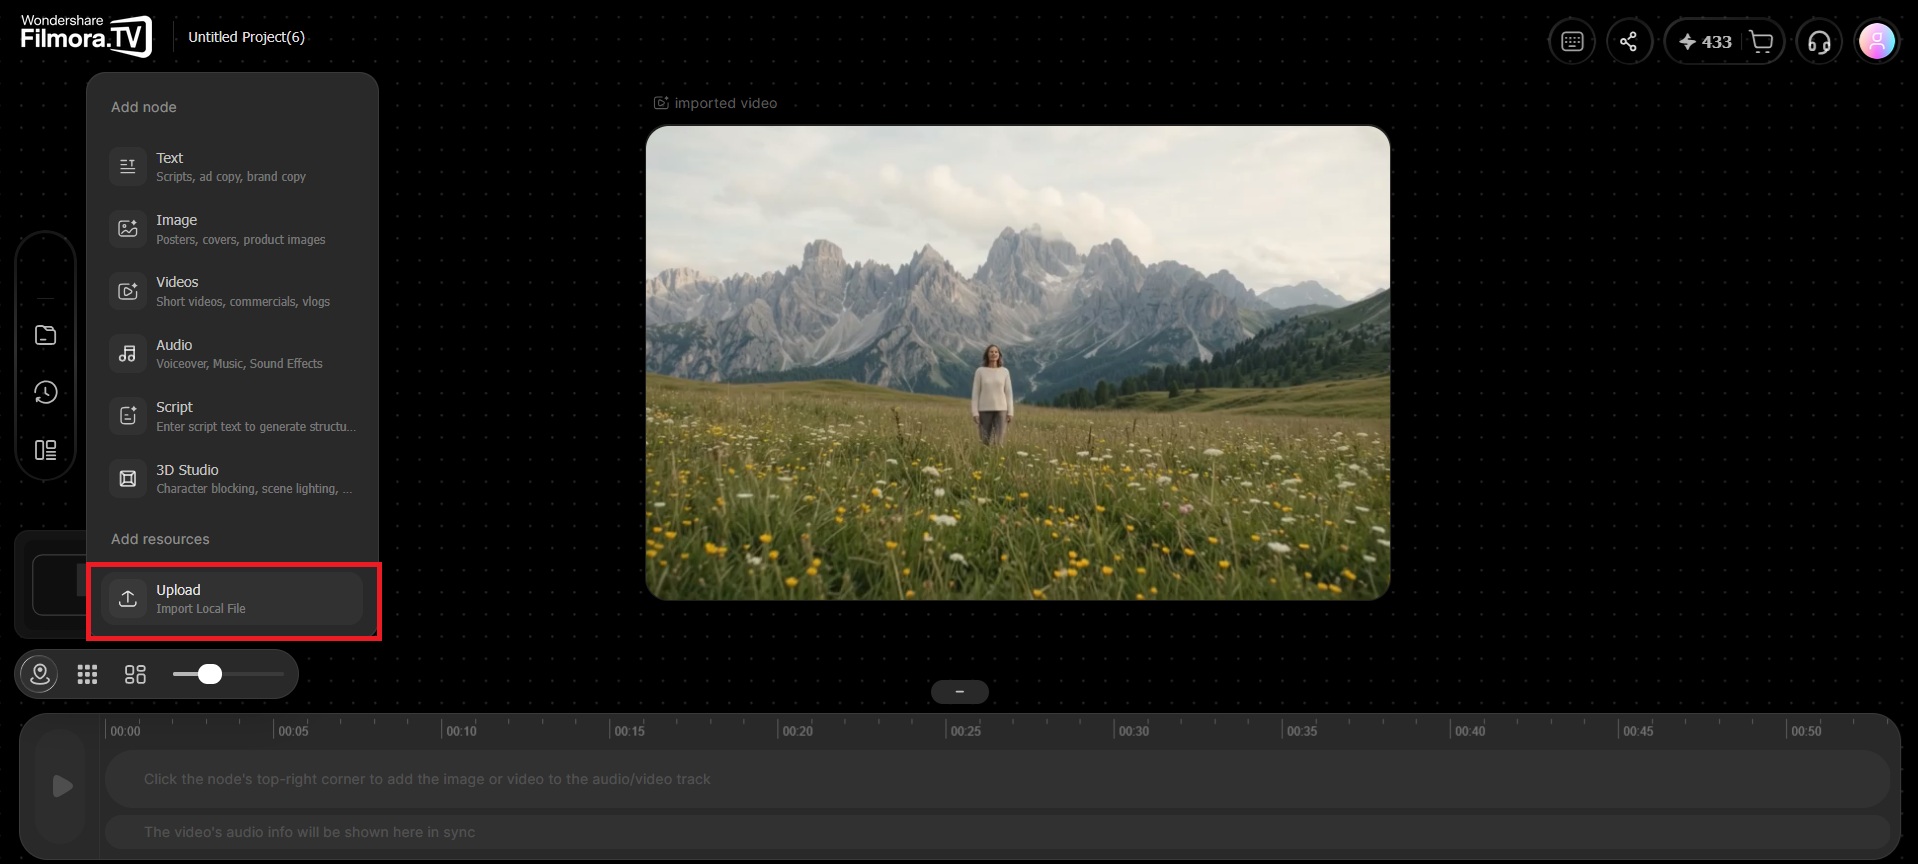
If you already have a file you want to use in your project, you can import it directly to the canvas without generating new content. Click Add (+), select "Upload," then choose the file you want to import from your device.
FAQs
-
1. Where can I add reference materials for video generation?
When generating a video, you can add reference materials in several ways: connect text, image, video, or audio nodes to the video node; upload local reference materials inside the video node; or add existing assets from the current project. You can also use @ in the prompt to describe how the reference material should be used. -
2. Does Filmora.TV support batch uploads or folder uploads?
It supports multi-select uploads and direct folder uploads. -
3. What types of local assets can Filmora.TV import?
Filmora.TV supports importing local assets such as images, videos, and audio files across mainstream file formats, and the supported formats will continue to expand. In addition, assets in the cloud Asset Library can be imported directly into the canvas, and any asset on the canvas can be saved back to the cloud Asset Library for easier management and reuse. -
4. Why am I unable to import a file, or why did the import fail?
Import failures are usually related to the network environment, Cloud Space capacity, file format, or content review. First make sure your connection is stable, Cloud Space is not full, and the file format and size meet the in-product requirements. If you are using a company intranet, VPN, proxy, or firewall environment, switch to a stable network and try again. If the issue persists, provide a screenshot of the error, the file type, and the upload time to support for investigation. -
5. Do I need to write a script before generating a video, and do I need to write it myself?
Not necessarily. You can generate a video directly from a text description, or first use a text node to let AI create a script, storyboard, character setup, or product selling points, then connect that content to image or video nodes as reference. For ad videos, story videos, or multi-shot content, preparing a storyboard first usually helps the result stay more coherent. -
6. Can an existing video be parsed into storyboards, prompts, and shot information?
Yes. Click the video node and use the Analyze feature in the toolbar above. Video Analyze can break an existing video into storyboards, timestamps, scene descriptions, narrative content, shot size, angle and camera movement, lighting and mood, sound effects, dialogue or narration, image-generation prompts, and video-motion prompts, making it easier to study and reuse.
Was this guide helpful?